

So, the construction chaos is finally over, and your new tile floors are in, but now what? Are the tiles looking a little grimy after all the work? Don’t worry, you’ve got this. Getting your tiles sparkling clean again is easier than you think if you follow a few tried-and-true Tile Cleaning Melbourne tips.
In just a short time, you’ll have your tiles looking as good as new and wondering why you didn’t do this sooner. Ready to get your tiles back in tip-top shape? Follow these 7 proven tile cleaning tips, and you’ll be well on your way to cleaner, shinier tiles in no time. Let’s get started!
Tip 1: Remove Construction Debris
To start, you’ll want to sweep away any leftover dust, dirt or debris from the construction process. Use a broom, dustpan and damp mop or cloth to wipe away anything clinging to the tile surface. For stubborn messes, you may need to scrub a bit harder with an abrasive sponge or scrubber.
Vacuum up the larger particles with a shop vac or vacuum with strong suction. Pay extra attention to the grout lines and crevices where grime can hide. Use the hose or crevice tool to suck up debris along the edges and in corners.
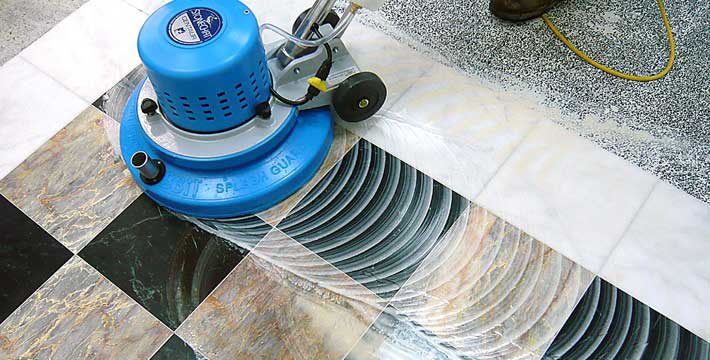
For tile floors, consider renting an industrial floor scrubber to clean the entire area thoroughly. Their powerful brushes and vacuum suction can lift away layers of built-up filth in a single pass.
Mop the tiles with a mixture of warm water and either vinegar or a degreasing dish soap once you’ve swept and vacuumed. Change your mop water frequently as you work to avoid just pushing around dirt and grime.
Rinse the tiles with clean water to remove any remaining residue and let air dry completely before allowing foot traffic on the floors. Your tiles should now be fresh, clean and ready for their first sealant or wax to protect them from future stains and damage. With a little elbow grease, you can get your new tile installation sparkling in no time!
Tip 2: Vacuum or Sweep the Tiles
Once construction is done, your tiles are covered in a layer of grime and debris. Vacuuming or sweeping is key to removing the bulk of it before mopping.
Using a vacuum with proper attachments or a broom, thoroughly sweep all tile floors to pick up dirt, sawdust, and other loose particles. Be meticulous and get into corners and edges for the best result. For stubborn debris caught in grout lines, use a scrub brush, toothbrush, or tile grout cleaning tool to loosen before vacuuming.
Tile floors can scratch easily, so make sure any vacuums, brushes or brooms you use have soft bristles. Canister vacuums with specialised bare floor attachments, microfiber dusting pads, and soft-bristled tile brooms are ideal options and help prevent damage to your investment.
Once swept, your tiles will be largely grit-free and ready for deep cleaning and mopping. Mopping tiles when there is still debris present just moves dirt and grit around and can lead to scratches.
By taking the time to sweep and prep your tiles thoroughly, you’ll get them sparkling clean without damage. Your patience will pay off – just look at how those tiles shine!
Tip 3: Use a pH-neutral Cleaner
For tile cleaning after construction, using a pH-neutral cleaner is key. A neutral cleaner will thoroughly clean tiles without damaging them. Look for a tile cleaning products specifically meant for cleaning tiles, such as a tile or grout cleaner. If using a multi-purpose tile cleaning products, check that it’s safe for use on tiles and grout and has a neutral pH of around 7.
Some good options for pH-neutral tile cleaners include:
- Hydrogen peroxide-based cleaners: Hydrogen peroxide is a mild bleaching agent that brightens and disinfects without damaging tiles or grout. Look for a product with 3% hydrogen peroxide.
- Vinegar and water: For a natural solution, mix equal parts white vinegar and water. The vinegar helps cut through grime and soap scum without damaging most tile surfaces. Do a patch test first to ensure it’s safe for your tiles.
- Baking soda: Make a paste from baking soda and water and scrub tiles with the paste using a sponge or non-abrasive scrubber. Rinse well with water. Baking soda is a gentle abrasive that can help lift away stubborn dirt and stains.
- Commercial tile cleaners: Products like Tilex, Clorox Tile & Grout Cleaner and Zep Grout Cleaner are formulated to be pH-neutral and safe for most tiles and grout. Follow the directions to dilute the product as needed.
Using a pH-neutral cleaner, along with hot water and elbow grease, will have your tiles sparkling clean in no time after construction without damage. Be sure to rinse tiles and mop floors thoroughly when done cleaning to remove any remaining residue.
Tip 4: Scrub Grout Lines
The grout lines between tiles are prone to grime buildup during construction. Give your grout a good scrubbing to get your tiles sparkling clean.
Use an abrasive sponge or scrubber along with a commercial tile and grout cleaner or a natural solution of baking soda and water. Scrub the grout lines in small sections at a time, rinsing thoroughly with water as you go. For tough stains in the grout, make a paste from baking soda and water and let it sit before scrubbing.
Be sure to rinse the entire area with water to remove any remaining dirt or cleaning solution residue when scrubbing. Once clean, you may want to apply a sealant to the grout lines to protect them from future stains. Re-sealing grout every 6-12 months will help keep your tile floors or walls looking their best.
Taking the time to scrub grout lines after construction will ensure your new tile installation looks as good as new for years to come.
Tip 5: Rinse Thoroughly
After cleaning the tiles, it’s critical to rinse them well with water to remove any remaining dirt or cleaning solution residue. Leftover grime and chemicals can damage the tile over time or leave unsightly marks if not properly rinsed away.
Pour fresh water over the entire tiled area and use a sponge or mop to wipe away the water and lift any remaining debris. You may need to repeat this rinsing process several times to ensure all tiles are clean. For textured or porous tiles like natural stone, grout lines and crevices may require extra attention during rinsing to penetrate deeper into the tile.
Once you’ve rinsed the tiles to your satisfaction, use a squeegee, towel or mop to wipe the tiles and eliminate any remaining water pools. Allow 24 to 48 hours for the tiles to air dry completely. Avoid walking on wet tiles during this time to prevent slip hazards and allow moisture to escape from under tile edges or in grout lines.
Freshly cleaned tiles make a space feel bright, open and rejuvenated. Take your time with the rinsing and drying steps—your attention to detail will be well worth the effort.
Tip 6: Dry the Tiles
Once you’ve cleaned the tiles, it’s important to dry them completely to avoid water spots and streaks. Leaving excess moisture on tiles can lead to mildew growth, discolouration, and other damage.
Use rags or microfiber cloths
Grab some clean rags, towels or microfiber cloths and gently blot tiles to absorb as much water as possible. Don’t scrub the tiles at this point, just lightly pat them dry. Microfiber is very effective at absorbing moisture and is lint-free, so it won’t leave behind little fibres. For stubborn water spots, you may need to gently wipe them away with a damp rag or cloth.
Squeegee edges and grout lines
Use a rubber squeegee to wipe away water from edges, corners and grout lines where rags can’t reach. Pull the squeegee down tile edges at an angle to direct water off the surface. Wipe the squeegee blade with a rag periodically to keep it clean.
Blow dry with air mover
For large tile jobs or areas where water has pooled, use an air mover like a carpet fan or utility fan to speed up drying. Keep the air mover at a distance and on a lower setting, then slowly move it closer to the tiles. The moving air will evaporate surface moisture and circulate air under and around tiles.
Check for remaining dampness
Do a final check of tiles with your hand to ensure all areas are dry before allowing foot traffic. Any remaining moisture can lead to slips and falls, especially on smooth tiles. Give tiles at least 2 to 3 hours of drying time before walking on them. It’s best to do tile cleaning Melbourne and drying when you have adequate time, and the space won’t be used for a while.
Tip 7: Apply Sealer (Optional)
Once your tile installation is complete, applying a sealant is an optional final step. A sealant, like a tile sealer or stone sealer, helps protect the surface from stains and damage. For most DIYers and homeowners, a sealant may not be necessary, but it can help improve the longevity and appearance of your tiles.
Why Apply a Sealant?
A sealant protects tiles from staining by creating a protective barrier. It helps prevent grout haze and allows for easier cleaning of tiles. A sealant also enhances the natural beauty of tiles like travertine, slate, and limestone by enriching colours and bringing out character. For high-traffic, high-moisture areas like showers, a sealant is recommended to prevent water damage.
Applying the Sealant
Carefully follow the directions on your product for proper application. Make sure the tile surface is clean and dry before applying the sealer. Apply at least two coats of sealant for the best protection, waiting for it to dry in between coats. Ventilate and avoid walking on tiles during the drying time. Once cured, your tiles will be protected and ready to showcase!
DIY vs. Professional Tile Cleaning Services
Whether to hire tile cleaning professional team or tackle the job yourself is a question many homeowners face after construction. DIY tile cleaning after construction can save money but requires time, effort, and the right knowledge and equipment. Tile cleaning professional services may cost more upfront but can offer a deep, sparkling clean without frustration.
DIY Tile Cleaning
If you’re on a budget or enjoy hands-on work, DIY tile cleaning is doable. You’ll need protective gear like gloves, goggles and a dust mask, plus tile-specific cleaners, degreasers, scrub brushes, mops, and vacuums. Scrub away grime and debris with a degreaser like ammonia or dish soap and hot water. For stuck-on messes, use an abrasive sponge or scrubber. Mop the tiles and grout lines thoroughly when scrubbing is done. Finally, buff tiles with a microfiber cloth to make them shine.
Professional Tile Cleaning Services
For busy homeowners or difficult cleaning jobs, professional tile cleaning Melbourne service is worthwhile. They have the proper training, tools, and cleaning solutions to deep clean and restore your tiles. Professionals can also re-grout, re-caulk and seal tiles if needed. They’ll scrub tiles, clean grout lines, and use commercial equipment like steam cleaners to sanitise tiles. The results will leave your tiles looking brand new without the hassle.
DIY cleaning requires more effort but can save money if you have the time. For the best results, professional tile cleaning Melbourne service is ideal. Your tiles will stay bright and clean for years to come.
Conclusion
There you have it. Hopefully, these 7 tile cleaning tips after construction will help you successfully get your tiles sparkling clean.
Now roll up your sleeves, grab those supplies and get scrubbing. Your tiles will be looking brand new in no time. And once you’re done, stand back and admire your handiwork. All that hard work will be so worth it when you see how bright and shiny your tiles look. You’ve got this!
With some elbow grease and perseverance, cleaning tiles after construction will ensure long-lasting results. For a truly professional finish, consider hiring Total Floor Service, a trusted name in professional tile cleaning Melbourne service. Our expertise and specialised equipment can make your tiles look as good as new without the hassle.
Say goodbye to post-construction grime and hello to sparkling, pristine tiles!

