

In high-traffic territories, for example, your restroom or kitchen fired tile takes bunches of misuse. Clay floors have it harder than the dividers – they’re strolled over and played on, so scratches appear quick. Earth and trash get into these scratches, making the tile look unendingly soiled even after you’ve cleaned it. If the scratches aren’t excessively profound, Tile Cleaning in Melbourne with a delicate grating is generally enough to dispose of them.
Floor tile support is significant on the off chance that you want to keep your floor fit as a fiddle. Now and again, scratched tiles must be supplanted; be that as it may, you might have the option to fix the harm at times.

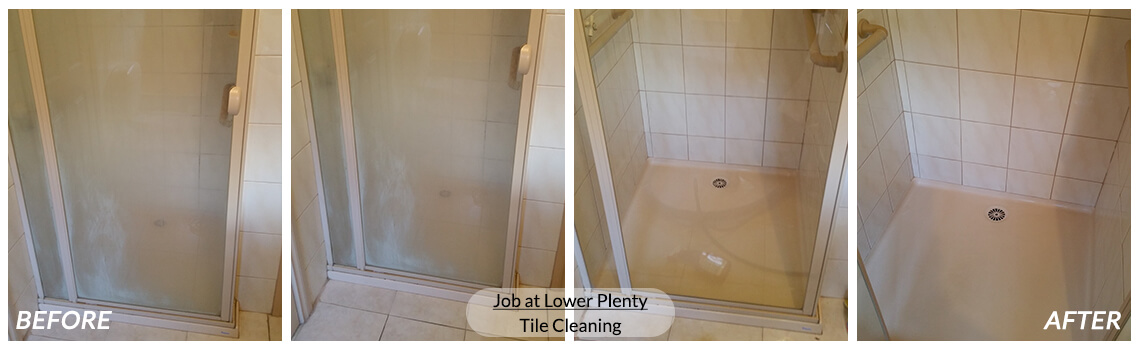
Total Floor Service brings up the tile and grout cleaning services in Melbourne that can be used to repair scratches.
Stage 1 – Identify Tiles
A scratched artistic tile shows up without any problem. It shouldn’t be tough to recognising the tile needing fix. It is a smart thought to analyse your floor cautiously to identify all rates of scratches. Along these lines, you can attempt to fix once instead of in ensuing stages. A well kept up artistic floor makes the room appealing and charming to be in.
Stage 2 – Mark the Tiles
When you’ve distinguished all the scratched tiles, mark them with a bit of chalk. It’s ideal to utilise chalk as it tends to be handily cleaned away when you’re set.
Stage 3 – Clean the Scratch
Fill the bowl with warm water midway. Include dishwashing fluid. Blend well to convey the cleanser in the water equally. Plunge a wipe in the blend and work on the scratch. Make sure to clean through the whole length of the scratch. That will wipe out all earth and little particles from the territory. Wipe the scratch dry with a delicate fabric when you finish.
Stage 4 – Apply Brass Polisher
Put a limited quantity of metal polisher on a perfect, delicate material. On the other hand, you may utilise toothpaste or vinegar. Rub the item into the scratch and all the edges. It is ideal to use little, roundabout movements. Inevitably the scratch should not, at this point be noticeable.
Stage 5 – Apply Car Wax
Utilise a delicate fabric to apply some vehicle wax over the scratch, and it will help to seal the zone.
Stage 6 – Clean Chalk Marks
Utilise a clammy material to wipe away the markings prior made. Once fixed and cleaned, your clay floor should look tantamount to when previously introduced.
Tips
Look at the degree of harm brought about by scratch. If the damage goes past the surface shading coat, it is ideal for supplanting a scratched floor tile. Continuously purchase enough tiles to keep some as additional when you introduce your floor. They will prove to be useful should substitution needs emerge. It is hard to get the specific match to your current tiles when you buy a lot later after establishment.
Hence, with the expert Tile Cleaning in Melbourne services, you can maintain the tile condition for a longer period of time.

